|
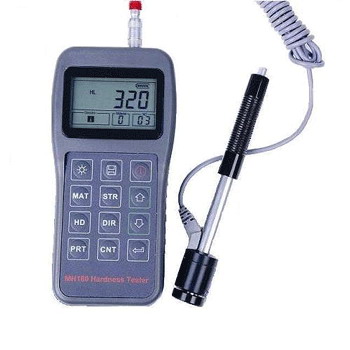
Hardness tester MH180

-Wide measuring range. Based on the principle of Leeb hardness testing
theory. -It can measure the Leeb hardness of all metallic materials.
-Large screen LCD, showing all functions and parameters. With EL
background light.
-Seven impact devices are available for special application.
Automatically identify the type of impact devices.
-Test at any angle, even upside down.
-Direct display of hardness scales HRB, HRC, HV, HB,
HS, HL
-Large memory could store 100 groups (Relative to average times 32~1 )
information including single measured value, mean value,
impact direction, impact times, material and hardness scale
etc.
-Battery information showing the rest capacity of the battery.
-User calibration function.
-Software to connect to PC via RS232 port. Micro printer support.
-Compact plastic case, suitable for
use under poor working conditions
-Continuous working period of no less than 100 hours with two alkaline
batteries (AA size); Auto power off to save energy.
-Outline dimensions: 150×74×32 mm
-Bearings and other parts
-Failure analysis of pressure vessel, steam generator and other
equipment
-The installed machinery and permanently assembled parts.
-Testing surface of a small hollow space
-Material identification in the warehouse of metallic materials
-Rapid testing in large range and multi-measuring areas for large-scale
work piece
|
|
|
|
|
|
|
|
|
|
|
|
|
|
|
|
|
|
|
|
|
|
|
|
|
|
|
|
|
|
|
|
|
|
|
|
|
|
|
|
|
|
|
|
|
|
|
|
|
|
|
|
|
|
|
|
|
|
|
|
|
|
|
|
|
|
|
|
|
|
|
|
|
|
|
|
|
|
|
|
|
|
|
|
|
|
|
|
|
|
|
|
|
|
|
|
|
|
|
|
|
|
|
|
|
|
|
|
|
|
|
|
|
|
|
|
|
|
|
|
|
|
|
|
|
|
|
|
|
|
|
|
|
|
|
|
|
|
|
|
|
|
|
|
|
|
|
|
|
|
|
|
|
|
|
|
|
|
|
|
|
|
|
|
|
|
|
|
|
BRASS (copper-zinc alloys)
|
|
|
|
|
|
|
|
|
|
|
|
|
|
|
|
BRONZE (copper-aluminium/tin alloys)
|
|
|
|
|
|
|
|
|
|
|
|
|
|
|
|
|
Testing range in HLD
-Error and repeatability of displayed value see Table1-1 below.
Table 1-1
|
|
|
Hardness value of Leeb standard hardness block
|
|
|
|
|
|
|
|
|
|
|
|
|
|
|
|
|
|
|
|
|
|
|
|
|
|
|
|
|
|
|
|
|
|
|
|
|
|
|
|
|
|
|
|
|
-Measuring range: HLD(170~960)HLD
-Measuring direction: 0~360º
-Hardness Scale: HL, HB, HRB, HRC, HRA,
HV, HS
-Data memory: max. 100 groups (relative to impact times 32~1)
-Working power: 3V(2 AA size alkaline batteries)
-Continuous working period: about 100 hours (With backlight off)
-Communication interface: RS232
|
|
|
|
|
|
|
|
|
|
|
|
|
|
|
|
|
|
|
|
|
|
|
|
|
|
|
|
|
|
|
|
|
|
|
|
|
|
|
|
|
|
|
|
|
|
|
|
|
|
|
|
|
|
|
|
|
For use with G type impact device
|
|
|
Other type of impact devices and support rings
|
|
Refer to Table 3 and Table 4 in the appendix.
|
|
|
|
|
|
|
|
|
|
|
|
|
|
|
|
|
|
|
|
|
-Working temperature: 0ºC~+40ºC
-Storage temperature: -30ºC~+60ºC
-Relative humidity: ≤90%;
-The surrounding environment should avoid of vibration, strong
magnetic field, corrosive medium and heavy dust.
|
|
|
|
|
|
|
|
|
|
|
|
|
|
|
|
|
|
|
|
|
|
|
|
|
|
|
|
|
|
|
|
|
|
|
Mean roughness value of sample surface Ra:
|
|
|
|
|
|
|
|
|
|
|
|
|
Min. thickness of sample Coupling tightly
Min. layer thickness for surface hardening
|
|
|
|
|
|
|
|
|
|
|
|
|
|
|
|
|
|
|
|
|
|
|
|
|
|
|
|
|
|
|
|
Available type of impact device
|
DC: Test hole or hollow cylindrical; DL: Test
slender narrow groove or hole
|
D+15: Test groove or reentrant surface
|
C: Test small, light, thin parts and surface of
hardened layer
|
G: Test large, thick, heavy and rough
surface steel
|
E: Test super high hardness material
|
|
|
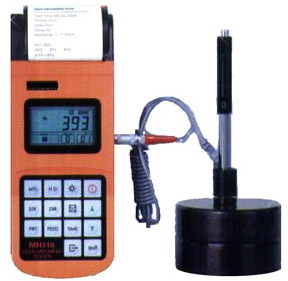
MH310 Portable Hardness
Tester

1.Advantages
-Wide measuring range. It can measure the hardness of all metallic
materials. Direct display of hardness scales HRB, HRC, HV, HB, HS, HL and
three types of strength values immediately.
-Large screen LCD, showing all functions and parameters. With EL background
light.
-Seven impact devices are available for special application. Automatically
identify the type of impact devices, and with the user calibration function.
-Test at any angle, even upside down.
-Large memory could store 100 groups (Relative to average times 32~1 )
information including single measured value, mean value, impact direction,
impact times, material and hardness scale etc.
-Battery information showing the rest capacity of the battery and the charge
status.
-Original imported high speed thermal printer support the immediate printing
function. It can save data permanently.
-NI-MH rechargeable battery as the power source. Charge circuit integrated
inside the instrument. Continuous working period of no less than 150 hours
(EL off and no printing).
-Auto power off to save energy.
-Excellent after-sale service system for high quality products--two years’
guarantee and all life maintenance. Easy to buy and comfortable to use.
2.Main Application
-Die cavity of molds
-Bearings and other parts
-Failure analysis of pressure vessel, steam generator and other equipment
-Heavy work piece
-The installed machinery and permanently assembled parts
-Testing surface of a small hollow space
-Material identification in the warehouse of metallic materials
-Rapid testing in large range and multi-measuring areas for large-scale work
piece
3.Technical Specifications
-Error and repeatability of displayed value:
|
No. |
Type of impact device |
Hardness value of Leeb
standard hardness block |
Error of displayed value |
Repeatability |
|
1 |
D |
760±30HLD |
±6 HLD |
6 HLD |
|
530±40HLD |
±10 HLD |
10 HLD |
|
2 |
DC |
760±30HLDC |
±6 HLDC |
6 HLD |
|
530±40HLDC |
±10 HLDC |
10 HLD |
|
3 |
DL |
878±30HLDL |
±12 HLDL |
12 HLDL |
|
736±40HLDL |
|
4 |
D+15 |
766±30HLD+15 |
±12 HLD+15 |
12 HLD+15 |
|
544±40HLD+15 |
|
5 |
G |
590±40HLG |
±12 HLG |
12 HLG |
|
500±40HLG |
|
6 |
E |
725±30HLE |
±12 HLE |
12 HLE |
|
508±40HLE |
|
7 |
C |
822±30HLC |
±12 HLC |
12 HLC |
|
590±40HLC |
-Measuring range: HLD(170~960)HLD
-Measuring direction: 0º~360º
-Hardness Scale: HL, HB, HRB, HRC, HRA, HV, HS
-Display: segment LCD
-Data memory: 100 groups max. (relative to impact times 32~1)
-Printing paper: width is (57.5±0.5)mm, diameter is 30mm.
-Battery pack: 6V NI-MH
-Battery charger: 9V/500mA
-Continuous working period: about 150 hours (With backlight off, no
printing)
-Communication interface: USB1.1
-Outline dimensions: 212mm×80mm×32mm
4.Configuration
Table
1-2
|
|
No. |
Item |
Quantity |
Remarks |
|
Standard
Configuration |
1 |
Main unit |
1 |
|
|
2 |
D type impact device |
1 |
With cable |
|
3 |
Standard test block |
1 |
|
|
4 |
Cleaning brush (I) |
1 |
|
|
5 |
Small support ring |
1 |
|
|
6 |
Battery Charger |
1 |
9V 500mA |
|
7 |
Paper for printing |
1 |
|
|
8 |
Manual |
1 |
|
|
9 |
Instrument package
case |
1 |
|
|
Optional
Configuration |
11 |
Cleaning brush (II) |
1 |
For use with G type
impact device |
|
12 |
Other type of impact
devices and support rings |
|
Refer to Table 3 and
Table 4 in the appendix. |
|
13 |
DataPro software |
1 |
|
|
14 |
Communication cable |
1 |
|
|
|
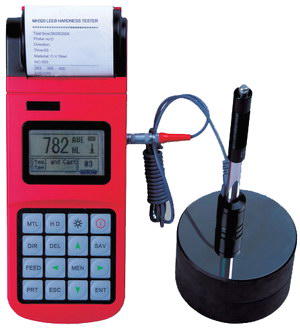
MH320
Portable Hardness Tester

1.Advantages
-Large screen(128×64 dot matrix LCD), showing all functions and parameters.
-Test at any angle, even upside down.
-Wide measuring range. It can measure the hardness of all metallic
materials. Direct display of hardness scales HRB, HRC, HV, HB, HS, HL and
three types of strength values immediately.
-Seven impact devices are available for special application. Automatically
identify the type of impact devices.
-Large capacity memory could store 500 groups (Relative to average
times32~1) information including single measured value, mean value, testing
data, impact direction, impact times, material and hardness scale etc.
-Upper and lower limit can be preset. It will alarm automatically when the
result value exceeding the limit.
-Battery information indicates the rest capacity of the battery and the
charge status.
-User calibration function.
-USB port with the PC humanity multi-functions data proceeding software.
-Original imported high speed thermal printer support the immediate printing
function. It can save data permanently.
-NI-MH rechargeable battery as the power source. Charge circuit integrated
inside the instrument. Continuous working period of no less than 150 hours
(EL off and no printing).
-Auto power off to save energy.
-Excellent after-sale service system for high quality products---two years’
guarantee and all life maintenance. Easy to buy and comfortable to use.
Compact plastic case
2.Main Application
-Die cavity of molds
-Bearings and other parts
-Failure analysis of pressure vessel, steam generator and other equipment
-Heavy work piece
-The installed machinery and permanently assembled parts
-Testing surface of a small hollow space
-Material identification in the warehouse of metallic materials
-Rapid testing in large range and multi-measuring areas for large-scale work
piece
3.Technical Specifications
-Measuring range: HLD(170~960)HLD
-Measuring direction: 360º
-Hardness Scale: HL, HB, HRB, HRC, HRA, HV, HS
-Display: dot matrix LCD, 128×64 dots
-Data memory: 500 groups max. (relative to impact times 32~1)
-Printing paper: width is (57.5±0.5)mm, diameter is 30mm
-Battery pack: 6V NI-MH
-Battery charger: 9V/500mA
-Continuous working period: about 150 hours (With backlight off, no
printing)
-Communication interface: USB1.1
-Outline dimensions: 212mm×80mm×32mm
4.Configuration
|
|
No. |
Item |
Quantity |
Remarks |
|
Standard Configuration |
1 |
Main Unit |
1 |
|
|
2 |
D type impact device |
1 |
With cable |
|
3 |
Standard test block |
1 |
|
|
4 |
Cleaning brush (I) |
1 |
|
|
5 |
Small support ring |
1 |
|
|
6 |
Battery Charger |
1 |
9V 500mA |
|
7 |
Paper for printing |
1 |
|
|
8 |
Manual |
1 |
|
|
9 |
Instrument case |
1 |
|
|
Optional Configuration |
11 |
Cleaning brush (II) |
1 |
For use with G type impact
device |
|
12 |
Other type of impact devices
and support rings |
|
Refer to Table 3 and Table 4
in the appendix. |
|
13 |
DataPro software |
1 |
|
|
14 |
Communication cable |
1 |
|
|
MH100
Pen Type Hardness Tester

Overview
With the Leeb hardness measuring principle,
the pen-type hardness tester MH100 can do test easily and quickly to various metallic material.
It can show the hardness measuring value immediately and can switch to other scales freely.
Specification
*Measuring Range: (170-960)HLD, (17-68.5)HRC, (19-651)HB, (80-976)HV, (30-100)HS, (59-85)HRA, (13 -100)HRB
*Measuring Direction :
Supprt 0~360º
*Hardness Scales: HL, HB, HRB, HRC, HRA, HV, HS
*Display: HD dox matrix LCD and LED backlight
*Data Memory: Max. 500 groups (relative to impact device 32~1)
*Working Power: 3.6V (Integrated Lithium battery and rechargable circuit)
*Continous Working Period:
about 200 hours (without using backlight)
*Communciation Interface: USB1.1 port
Applicable Materials
Applicable materials: steel and cast steel, cold work tool steel, stainess stee;. Grey cast iron, nodular cast iron, cast aluminum alloys,
BRASS (copper-zinc alloys), BRONZE(copper-aluminum/tin alloys), pure copper and forged steel
Working Conditions
Operating temperature -20°C~+60°C
Storage temperature: -30°C~+60°C
Relative humidity: ≤90%
The surrounding environment should avoid of vibration, strong magnetic field, corrosive medium and heavy dust.
Standard Configurations
1. Main Unit 1
2. Cleaning brush 1
3. Small support ring 1
4. Standard block 1
5. Dataproceeding Soatware with cable 1
6.
Accompany documents (including manual, quality certifcate, warranty card and packing list ) 1 set
7. ABS instrument case 1
|